
Punktuelle Undichtigkeiten am Flachdach – Lösungen für kritische Details
Punktuelle Undichtigkeiten entstehen bei Flachdächern fast immer an Details:
Innen– und Außenecken, Attiken, Durchdringungen oder Entwässerungspunkten.
In diesem Überblick zeigen wir typische kritische Anschlussbereiche und praxisbewährte Lösungen zur gezielten Instandsetzung – ohne vollständigen Abriss des Dachaufbaus.
Jeder dargestellte Detailpunkt kann einzeln instandgesetzt werden und ist sowohl für genutzte als auch nicht genutzte Flachdächer anwendbar – abhängig von der mechanischen Beanspruchung und der gewählten Armierung.
Die dargestellten Lösungen lassen sich flexibel an die jeweilige Anwendung anpassen.
Je nach Nutzung der Dachfläche und mechanischer Beanspruchung kommen Polyester-Geotextilien mit 110 g/m² oder 120 g/m² zum Einsatz.
Für eine wirtschaftliche und materialgerechte Ausführung stehen unterschiedliche Rollenbreiten zur Verfügung – 15 cm, 25 cm, 35 cm und 50 cm.
Da das Material laufmeterweise geliefert wird, kann die Armierung exakt auf den jeweiligen Detailbereich abgestimmt werden – ohne unnötigen Verschnitt oder Überdimensionierung.
Typische kritische Detailpunkte am Flachdach
Im Folgenden zeigen wir typische Detailpunkte, an denen es häufig zu punktuellen Undichtigkeiten kommt – mit praxisnahen Lösungen zur gezielten Instandsetzung.
Passende Materiallösung je nach Detailpunkt
Je nach Beanspruchung kommen unterschiedliche Geotextilien zum Einsatz.
Für Detailpunkte mit geringer mechanischer Beanspruchung
Für stärker beanspruchte oder genutzte Dachbereiche
Innenwinkel (Innenecke)
Warum Innenwinkel besonders schadensanfällig sind
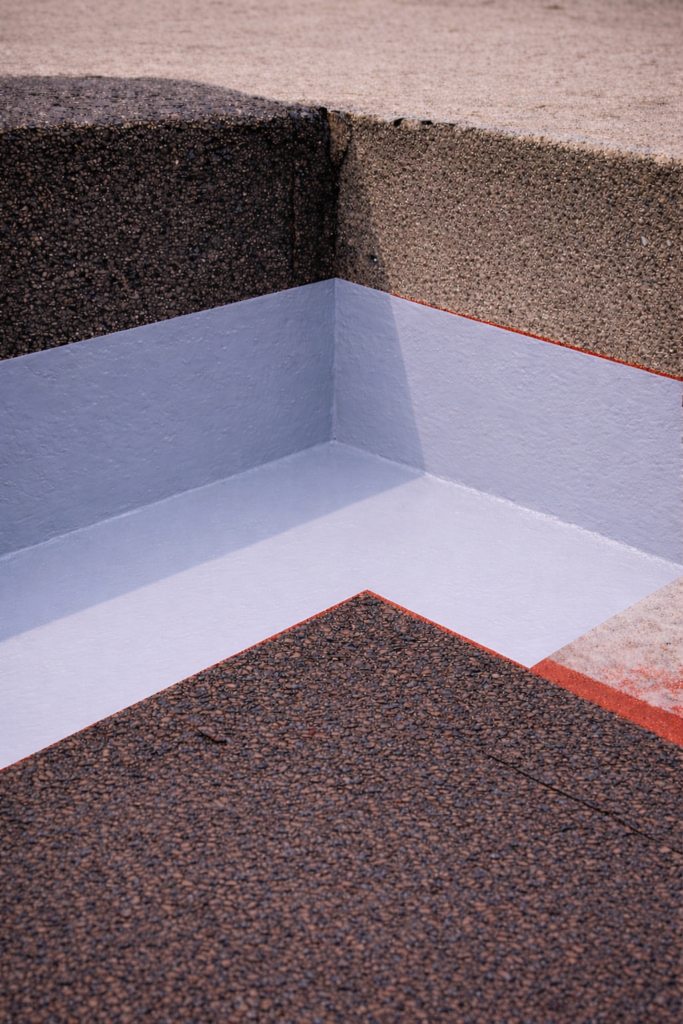
Innenwinkel gehören zu den kritischsten Detailpunkten bei Flachdächern.
Hier treffen horizontale und vertikale Flächen aufeinander – genau in diesem Bereich wirken:
Bewegungen des Untergrunds
Temperaturbedingte Spannungen
stehende Feuchtigkeit und Schmutzablagerungen
Gerade bei älteren Bitumenabdichtungen entstehen hier häufig feine Risse oder Ablösungen, die zu punktuellen Undichtigkeiten führen.
Grundprinzip der Instandsetzung
Ziel der Instandsetzung ist es, den Innenwinkel spannungsarm und dauerhaft zu verstärken, ohne den bestehenden Dachaufbau vollständig zu entfernen.
Dazu wird der Detailbereich gezielt armiert und anschließend in die neue Flüssigabdichtung eingebunden.
Vorbereitung des Untergrunds
Reinigung des Innenwinkels von Schmutz, losen Bestandteilen und haftungsmindernden Rückständen
Trockener, tragfähiger Untergrund
Alte Abdichtung bleibt erhalten, sofern sie fest haftet
Zuschnitt und Verarbeitung des Polyester-Geotextils im Innenwinkel
Für die zusätzliche Armierung von Innenwinkeln wird das Polyester-Geotextil so zugeschnitten, dass es sich spannungsfrei an Boden- und Wandflächen anlegen lässt – ohne Faltenbildung oder Einschnitte in der kritischen Zone.
Vorgehensweise – zusätzlicher Innenwinkel:
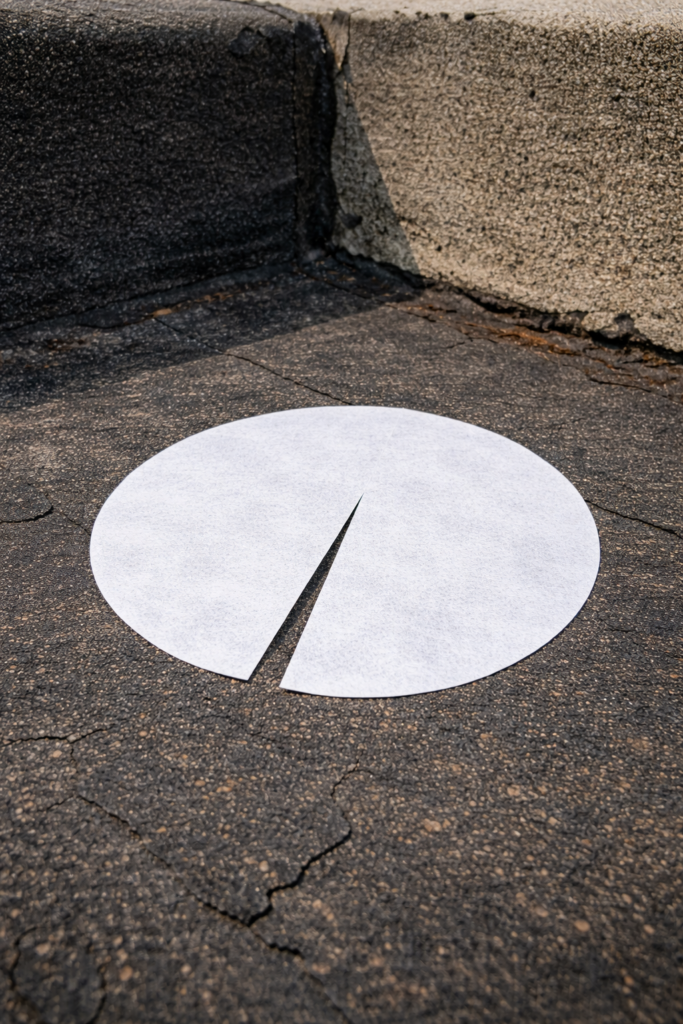
Das Polyester-Geotextil wird als runder Zuschnitt vorbereitet (ca. Ø 10 cm, abhängig von der Geometrie des Details).
Vom Rand zur Mitte wird ein einzelner Schnitt gesetzt (Foto 1), sodass sich das Material sauber in Boden- und Wandflächen einlegen lässt.Auf die vorgereinigte und grundierte Fläche wird ein erster Auftrag der Flüssigabdichtung aufgebracht.
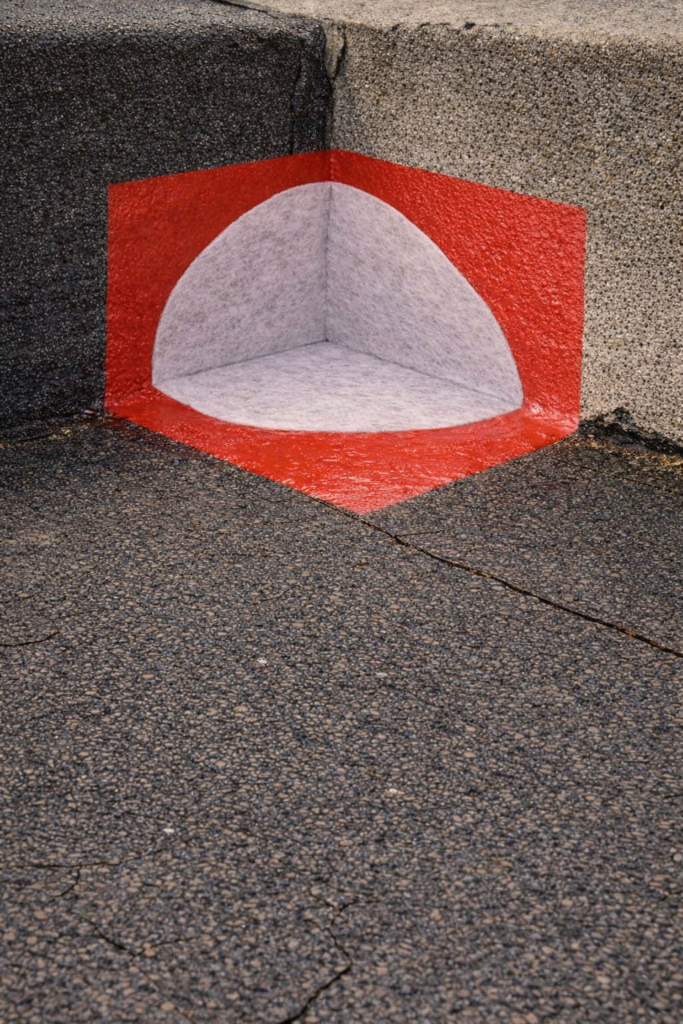
Das zugeschnittene Geotextil wird in die frische Flüssigabdichtung eingelegt (Foto 2) und mit einer Rolle sorgfältig angedrückt, bis es vollständig durchtränkt ist.
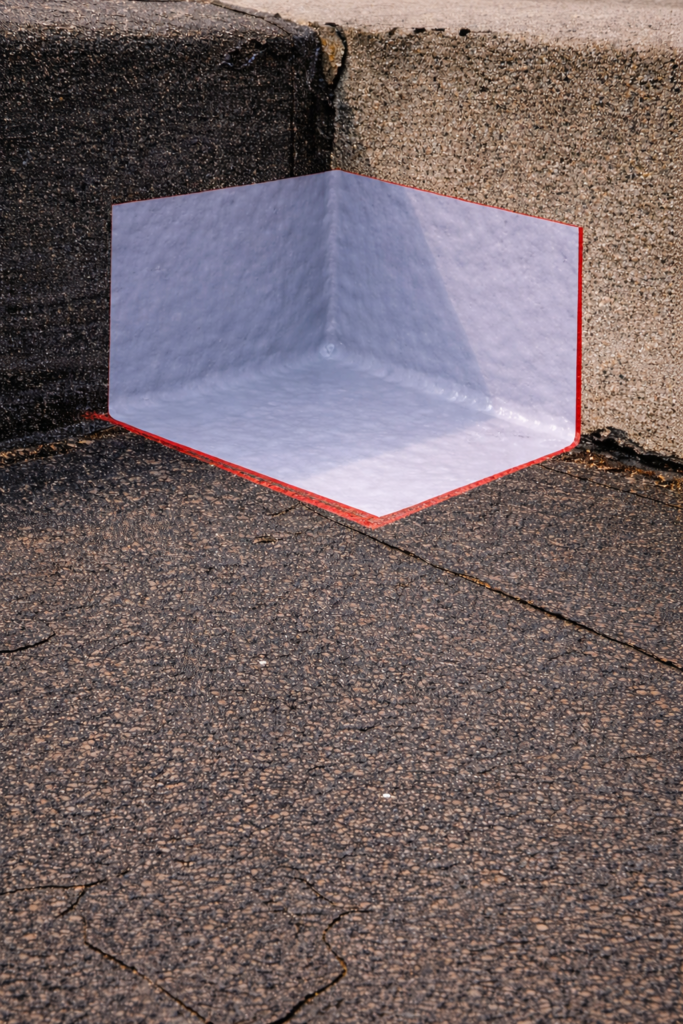
- Nach Durchtrocknung des ersten Auftrags wird ein zweiter Auftrag der Flüssigabdichtung ausgeführt (Foto 3).
Nach der zusätzlichen Verstärkung aller Innen- und Außenecken erfolgt die Armierung und Abdichtung des Attikaanschlusses an die horizontale Dachfläche.
Die Ausführung erfolgt nach demselben Grundprinzip wie beim Innenwinkel.
- Auf die grundierte Fläche wird ein erster Auftrag der Flüssigabdichtung aufgebracht
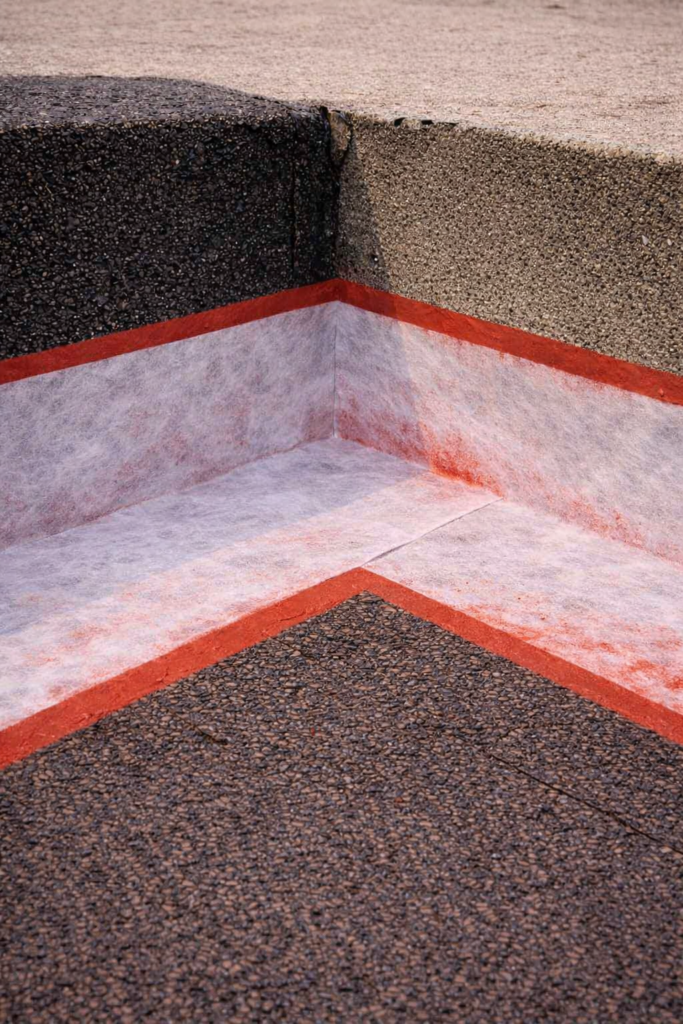
– ca. 20 cm vertikal und 15 cm horizontal. - Das Polyester-Geotextil wird in die frische Abdichtung eingelegt
– 15 cm an der Vertikalen, 10 cm auf der Horizontalen (Foto 4)
und mit der Rolle vollständig eingebettet. - Nach Trocknung des ersten Auftrags erfolgt der zweite Auftrag der Flüssigabdichtung. (Foto 5.)
👉 Der gezeigte Zuschnitt ermöglicht eine saubere, spannungsfreie Ausbildung des Innenwinkels ohne Schnitte oder Überlappungen in der kritischen Zone.
- Auf die grundierte Fläche wird ein erster Auftrag der Flüssigabdichtung aufgebracht
Materialempfehlung
Polyester-Geotextil 110 g/m²
für nicht genutzte Flachdächer und geringere mechanische BeanspruchungPolyester-Geotextil 120 g/m²
für stärker beanspruchte Dachflächen oder genutzte Bereiche
Geeignete Rollenbreiten
Je nach Detailgröße empfehlen sich Rollenbreiten von
15 cm, 25 cm, 35 cm oder 50 cm,
um materialgerecht, ohne unnötigen Verschnitt zu arbeiten.
Da das Geotextil laufmeterweise geliefert wird, kann die Armierung exakt auf den jeweiligen Detailpunkt abgestimmt werden.
Vorteil dieser Ausführung
 keine Schnitte im kritischen Eckbereich doppelte Armierung genau an der Innenecke faltenfreie, spannungsarme Verlegung dauerhaft sichere Grundlage für Flüssigabdichtungen
Ergebnis
Dauerhaft verstärkter Innenwinkel
Reduzierung von Spannungsrissen
Sichere Einbindung in die neue Abdichtung
Gezielte Instandsetzung ohne vollständigen Abriss
➡️ Die zusätzliche Armierung der Innenwinkel ist ein wesentlicher Bestandteil der Detailabdichtung.
Je nach Objekt können anschließend Außenecken, Dachentlüfter oder Wassereinläufe bearbeitet werden.
Der Attikaanschluss wird jedoch grundsätzlich erst nach der Fertigstellung von Innen- und Außenecken ausgeführt.
Außenecke
Außenecke – gezielte Armierung mit Polyester-Geotextil
Außenecken gehören zu den am stärksten beanspruchten Detailpunkten auf Flachdächern.
Hier wirken Bewegungen aus Temperaturwechseln, mechanische Spannungen sowie Schubkräfte aus der Abdichtung besonders intensiv.
Um Rissbildung und Undichtigkeiten zuverlässig zu vermeiden, ist eine gezielte, spannungsfreie Armierung erforderlich.
Prinzip der Lösung
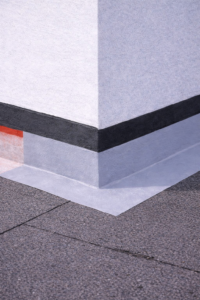
Da sich ein durchgehendes Geotextilstück ohne Zuschnitt nicht faltenfrei über eine Außenecke führen lässt, erfolgt die Armierung mit zwei zugeschnittenen Geotextilstreifen.
Die Schnitte werden seitlich zur Eckzone gesetzt, sodass der eigentliche Eckbereich nicht eingeschnitten, sondern doppelt überlappt und verstärkt wird.
👉 Dadurch entsteht eine besonders sichere Abdichtung genau an der kritischen Stelle.
Vorgehensweise Schritt für Schritt
1. Vorbereitung des Untergrunds
Untergrund reinigen, trocken und tragfähig herstellen
Grundierung entsprechend dem verwendeten Flüssigabdichtungssystem auftragen
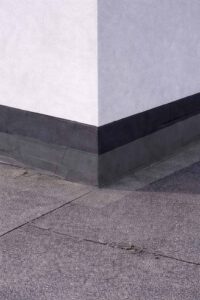
2. Erster Geotextilstreifen – Zuschnitt und Einbettung
Ein Streifen Polyester-Geotextil wird vorbereitet
An der Kante, die über die Außenecke geführt wird, erfolgt:
ein seitlicher Einschnitt ca. 10 cm tief
entlang der Linie Übergang Vertikal ↔ Horizontal
Auf die grundierte Fläche wird der erste Auftrag der Flüssigabdichtung aufgebracht
Der Geotextilstreifen wird:
spannungsfrei eingelegt,
über die Außenecke geführt,
gleichmäßig an Wand und Dachfläche angedrückt
Mit Rolle oder Spachtel wird das Geotextil vollständig in die frische Abdichtung eingebettet
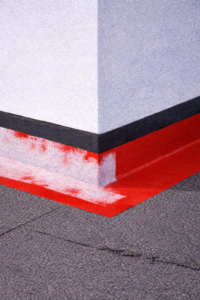
3. Zweiter Geotextilstreifen – spiegelbildliche Ausführung
Von der gegenüberliegenden Seite der Außenecke wird ein zweiter Geotextilstreifen vorbereitet
Auch hier:
seitlicher Einschnitt ca. 10 cm,
entlang der Linie Vertikal ↔ Horizontal
Der Streifen wird so eingelegt, dass:
die vertikale Geotextilfläche den ersten Streifen überlappt,
die horizontale Fläche ebenfalls flächig überlapp
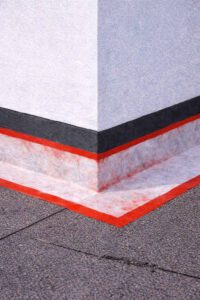
4. Ergebnis: doppelte Armierung im Eckbereich
Die Überlappung der beiden Streifen sorgt dafür, dass:
der eigentliche Außenwinkel ohne Einschnitt bleibt
im Eckbereich eine doppelte Lage Polyester-Geotextil entsteht
Nach Durchtrocknung des ersten Auftrags wird:
der zweite Auftrag der Flüssigabdichtung vollflächig ausgeführt
👉 Der Außenwinkel ist nun spannungsfrei, rissüberbrückend und dauerhaft verstärkt.
Materialempfehlung
Polyester-Geotextil 110 g/m²
für nicht genutzte Flachdächer und geringere mechanische BeanspruchungPolyester-Geotextil 120 g/m²
für stärker beanspruchte Dachflächen oder genutzte Bereiche
Geeignete Rollenbreiten
Je nach Detailgröße empfehlen sich Rollenbreiten von
15 cm, 25 cm, 35 cm oder 50 cm,
um materialgerecht, ohne unnötigen Verschnitt zu arbeiten.
Da das Geotextil laufmeterweise geliefert wird, kann die Armierung exakt auf den jeweiligen Detailpunkt abgestimmt werden.
Vorteil dieser Ausführung
✔ keine Schnitte im kritischen Eckbereich
✔ doppelte Armierung genau an der Außenecke
✔ faltenfreie, spannungsarme Verlegung
✔ dauerhaft sichere Grundlage für Flüssigabdichtungen
Ergebnis
Dauerhaft verstärkter Außenwinkel
Reduzierung von Spannungsrissen
Sichere Einbindung in die neue Abdichtung
Gezielte Instandsetzung ohne vollständigen Abriss
➡️ Nach der gezielten Verstärkung der Außenecken können – abhängig vom Sanierungskonzept – Dachentlüfter und Wassereinläufe abgedichtet werden.
Der Attikaanschluss erfolgt stets nach der vollständigen Ausführung von Außen- und Innenecken, da die Abdichtung der Attika auf die vorbereiteten Eckbereiche übergeführt wird.
Dachentlüfter / Aerator
Einsatzbereich
Dachentlüfter (Aeratoren) gehören zu den kritischsten Durchdringungen in Flachdachkonstruktionen.
Temperaturwechsel, Materialbewegungen und stehendes Wasser führen hier häufig zu Rissen und Undichtigkeiten.
Durch gezielte Verstärkung mit Polyester-Geotextil wird eine dauerhaft elastische und spannungsarme Abdichtung erreicht.
Vorgehensweise Schritt für Schritt
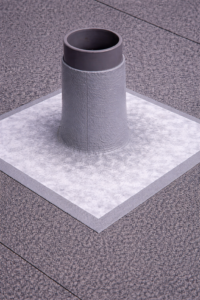
1. Vorbereitung des ersten Armierungselements (Geotextil)
Es wird ein quadratisches Stück Polyester-Geotextil verwendet
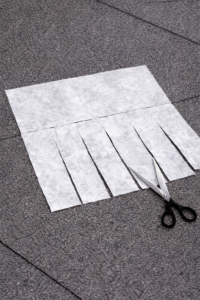
(Größe abhängig vom Durchmesser des Aerators und der erforderlichen Verstärkungszone).Von einer Seite des Quadrats werden 6–8 Schnitte bis etwa zur halben Länge ausgeführt.
👉 Zweck der Einschnitte:
Der ungeschnittene Bereich kann faltenfrei an der vertikalen Rohrfläche anliegen.
Die eingeschnittenen „Laschen“ legen sich spannungsfrei auf die horizontale Dachfläche.
Die Einschnitte dienen ausschließlich der geometrischen Anpassung, nicht der Schwächung des Materials.
2. Einbettung des ersten Armierungselements
- Auf die gereinigte und grundierte Fläche wird reichlich Flüssigabdichtung aufgetragen auf die horizontale Dachfläche rund um den Aerator sowie auf die vertikale Rohrfläche etwas oberhalb der späteren Geotextilhöhe.
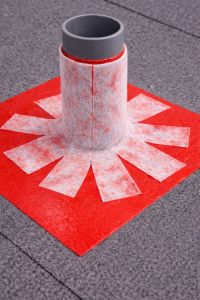
Das vorbereitete Geotextil wird in die frische Abdichtung eingelegt:
– Der ungeschnittene Teil wird eng um das Rohr geführt.
– Die Laschen werden gleichmäßig auf der Dachfläche verteilt ohne Spannung und ohne Faltenbildung.
– sorgfältig mit Rolle oder Spachtel andrücken, vollständige Durchtränkung sicherstellen. Lufteinschlüsse vermeiden.📌 In der Übergangszone Rohr ↔ Dach entsteht ein durchgehender, rissfreier Armierungsgürtel.
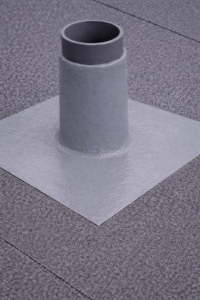
3.Vorbereitung des zweiten Armierungselements (zusätzliche Verstärkung)
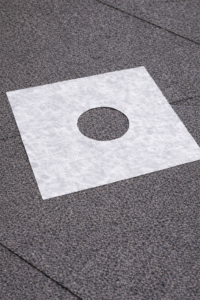
Für die zweite Armierung wird ein separates quadratisches Stück Geotextil mit derselben Größe wie das erste Quadrat verwendet.
In der Mitte wird eine runde Öffnung ausgeschnitten. Der Durchmesser der Öffnung ist 1–2 cm kleiner als der Rohrdurchmesser.
👉 Durch die Elastizität des Polyester-Geotextils legt sich das Material später sehr dicht und ohne Schnitte um das Rohr.
4. Einbettung des zweiten Armierungselements
- Nach dem Trocknen der ersten Abdichtungslage wird erneut eine ausreichend dicke Schicht Flüssigabdichtung aufgetragen.
- In diese frische Schicht wird das Geotextil mit der Öffnung über das Rohr gestülpt.
- Das Material wird eng an die Rohrwand angedrückt und vollflächig mit der unteren Abdichtungsschicht verbunden.
👉 So entsteht eine zweistufige Armierung:
horizontal und vertikal, ohne Stoßfugen im kritischen Übergangsbereich und mit optimaler Haftung zwischen allen Schichten.
5. Schlussbeschichtung
Nach vollständiger Trocknung wird die finale, durchgehende Abdichtungsschicht aufgetragen, die alle Geotextillagen, Überlappungen und Übergänge vollständig einschließt.
Hinweis zur Materialwahl
Die Auswahl des Polyester-Geotextils richtet sich nach der geplanten Nutzung der Dachfläche und den zu erwartenden mechanischen Belastungen:
Polyester-Geotextil 110 g/m² – universell einsetzbar
Polyester-Geotextil 120 g/m² – für Dächer mit erhöhten Beanspruchungen
Dank verfügbarer Rollenbreiten von 0,15 m · 0,25 m · 0,35 m · 0,50 m und Verkauf laufmeterweise kann der Geotextilzuschnitt exakt an den jeweiligen Knoten angepasst werden – materialeffizient und wirtschaftlich.
Wichtige technische Logik (entscheidend für die Dauerhaftigkeit)
✅ Keine harten Schnitte im direkten Übergang Rohr ↔ Dach
✅ Geotextil arbeitet als räumliche Armierung, nicht als flache Einlage
✅ Zweilagige Abdichtung garantiert vollständige Haftung zwischen den Schichten
✅ Spannungen werden verteilt, nicht konzentriert
Ergebnis
Dauerhaft verstärkte Dachdurchdringung
Reduzierung von Spannungs- und Bewegungsrissen
Sichere Integration in neue oder bestehende Abdichtungssysteme
Gezielte Sanierung ohne vollständigen Rückbau
➡️ Die Abdichtung von Dachentlüftern kann unabhängig von Innen– und Außenecken sowie Wassereinläufen erfolgen.
Der Attikaanschluss wird jedoch stets erst nach der vollständigen Ausführung der Eckbereiche hergestellt.
Dachablauf / Wassereinlauf
Zusätzliche Armierung und Abdichtung von Wassereinläufen auf Flachdächern
Wassereinläufe gehören zu den am stärksten beanspruchten Bauteilen von Flachdächern.
Sie sind unmittelbar Temperaturschwankungen sowie Bewegungen der Dachkonstruktion ausgesetzt.
Eine gezielte, mehrstufige Armierung mit Polyester-Geotextil erhöht die Zuverlässigkeit der Abdichtung deutlich und reduziert das Risiko von Undichtigkeiten im Bereich der Wassereinläufe.
Vorgehensweise Schritt für Schritt
1. Vorbereitung des ersten Armierungselements (Geotextil)
Es wird ein quadratisches Stück Polyester-Geotextil verwendet
(Größe abhängig vom Durchmesser des Aerators und der erforderlichen Verstärkungszone).Von einer Seite des Quadrats werden 6–8 Schnitte bis etwa zur halben Länge ausgeführt.
👉 Zweck der Einschnitte:
dem nicht eingeschnittenen Bereich, sich faltenfrei und dicht an die Innenwand des Dachablaufs anzulegen,
den eingeschnittenen Bereichen, sich spannungsfrei auf der horizontalen Dachfläche auszubreiten.
📌 Die Einschnitte dienen nicht der Schwächung des Materials, sondern ausschließlich der geometrischen Anpassung vom horizontalen Dachbereich in den Innenbereich des Wassereinlaufs.
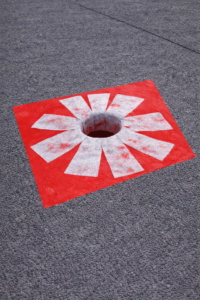
2. Auftrag der ersten Abdichtungsschicht und Einlage der ersten Geotextillage
Auf die gereinigte und grundierte Oberfläche wird ein satter erster Auftrag der Flüssigabdichtung aufgebracht:
auf die Dachfläche rund um den Wassereinlauf
(ca. 5 cm über die Abmessungen des Geotextilquadrats hinaus),sowie auf den oberen Bereich der Innenwand des Wassereinlaufs
(leicht unterhalb der späteren Geotextilhöhe).
Das vorbereitete Geotextilstück wird in die noch frische Abdichtung eingelegt:
der nicht eingeschnittene Bereich wird gleichmäßig in den Wassereinlauf gedrückt, sodass er an der Innenwand haftet,
die Streifen werden gleichmäßig auf der Dachfläche verteilt.
Anschließend wird das Geotextil sorgfältig mit einer Rolle angedrückt, um:
eine vollständige Durchtränkung mit dem Abdichtungsmaterial zu gewährleisten,
Luftblasen und Hohlstellen sicher zu vermeiden.
📌 In diesem Schritt entsteht eine durchgehende, schalenförmige Armierung, die sich von der Dachfläche in den Wassereinlauf hineinzieht.
3. Vorbereitung der zweiten Geotextillage
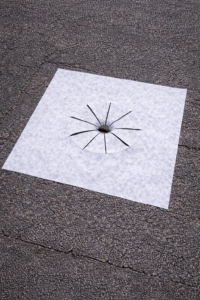
Als zweites Armierungselement wird ein quadratisches Stück Polyester-Geotextil in derselben Größe wie das erste verwendet.
Vom Zentrum des Quadrats werden 8–9 radiale Einschnitte ausgeführt,
deren Länge dem Radius des Wassereinlaufs entspricht.
4. Einlage der zweiten Geotextillage
Auf den vollständig getrockneten ersten Abdichtungslayer wird ein zweiter, satter Auftrag der Flüssigabdichtung aufgebracht:
auf die horizontale Dachfläche rund um den Wassereinlauf,
sowie auf den oberen Bereich der Innenwand des Wassereinlaufs
(leicht unterhalb der späteren Geotextilhöhe).
Das zweite Geotextilstück wird in den frisch aufgetragenen Abdichtungslayer eingelegt:
die radial eingeschnittenen Laschen werden in den Wassereinlauf hineingeklappt und liegen dicht an der Innenwand an,
der nicht eingeschnittene Bereich verbleibt auf der Dachfläche und überdeckt die Laschen der ersten Geotextillage vollständig.
📌 Dadurch entsteht eine zweistufige Armierung innerhalb des Wassereinlaufs und auf der Dachfläche –
ohne harte Übergänge in der kritischen Zone.
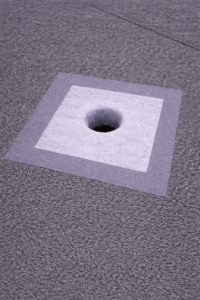
5. Abschließender Abdichtungslayer
Nach dem Einlegen der zweiten Geotextillage wird ein weiterer, deckender Auftrag der Flüssigabdichtung ausgeführt, sodass:
beide Geotextillagen vollständig überdeckt sind,
sämtliche Übergänge von der Dachfläche zum Wassereinlauf sicher eingeschlossen werden.
Nach dem Aushärten entsteht eine homogene, durchgehende Abdichtung ohne Schwachstellen.
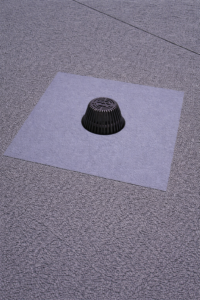
Hinweis zur Materialwahl
Die Auswahl des Polyester-Geotextils richtet sich nach der Nutzung und der mechanischen Beanspruchung der Dachfläche:
Polyester-Geotextil 110 g/m² – universell einsetzbar
Polyester-Geotextil 120 g/m² – für erhöhte mechanische Belastungen
Dank unterschiedlicher Rollenbreiten (z. B. 15 cm, 25 cm, 35 cm, 50 cm) und der laufmeterweisen Lieferung kann das Material exakt auf jedes Detail abgestimmt werden – ohne Überdimensionierung und unnötigen Verschnitt.
Ergebnis
- Zuverlässig abgedichteter Wassereinlauf
- Reduzierung von Spannungsrissen im Übergangsbereich
- Sichere Integration in neue oder bestehende Flüssigabdichtungssysteme
- Gezielte Instandsetzung ohne vollständigen Rückbau der Dachkonstruktion
➡️ Die Abdichtung von Wassereinläufen kann flexibel in den Sanierungsablauf integriert werden.
Innen– und Außenecken, Dachentlüfter sowie Wassereinläufe sind unabhängig voneinander ausführbar, während der Attikaanschluss grundsätzlich den Abschluss nach der Eckarmierung bildet.
Attika / Parapet
Armierung und Abdichtung des Übergangs von Vertikal- zu Horizontalfläche
Das Anschlussdetail zwischen Attika (Parapet) und Dachfläche zählt zu den am stärksten beanspruchten Bereichen eines Flachdachs.
Nachdem alle Innen- und Außenecken bereits separat verstärkt und abgedichtet wurden, kann die Armierung des linearen Übergangs von Vertikal- zu Horizontalfläche einfach, sauber und ohne zusätzliche Einschnitte ausgeführt werden.
Prinzip der Lösung
Da sich ein durchgehendes Geotextilstück ohne Zuschnitt nicht faltenfrei über eine Außenecke führen lässt, erfolgt die Armierung mit zwei zugeschnittenen Geotextilstreifen.
Die Schnitte werden seitlich zur Eckzone gesetzt, sodass der eigentliche Eckbereich nicht eingeschnitten, sondern doppelt überlappt und verstärkt wird.
👉 Dadurch entsteht eine besonders sichere Abdichtung genau an der kritischen Stelle.
Vorgehensweise Schritt für Schritt
1. Untergrund vorbereiten
Die Anschlussflächen werden gründlich gereinigt und gemäß Herstellervorgaben grundiert.
Der Untergrund muss tragfähig, sauber und trocken sein.
2. Erster Auftrag der Flüssigabdichtung
Die Flüssigabdichtung wird gleichmäßig aufgetragen:
mindestens 15 cm auf der vertikalen Fläche (Attika)
mindestens 15 cm auf der horizontalen Dachfläche
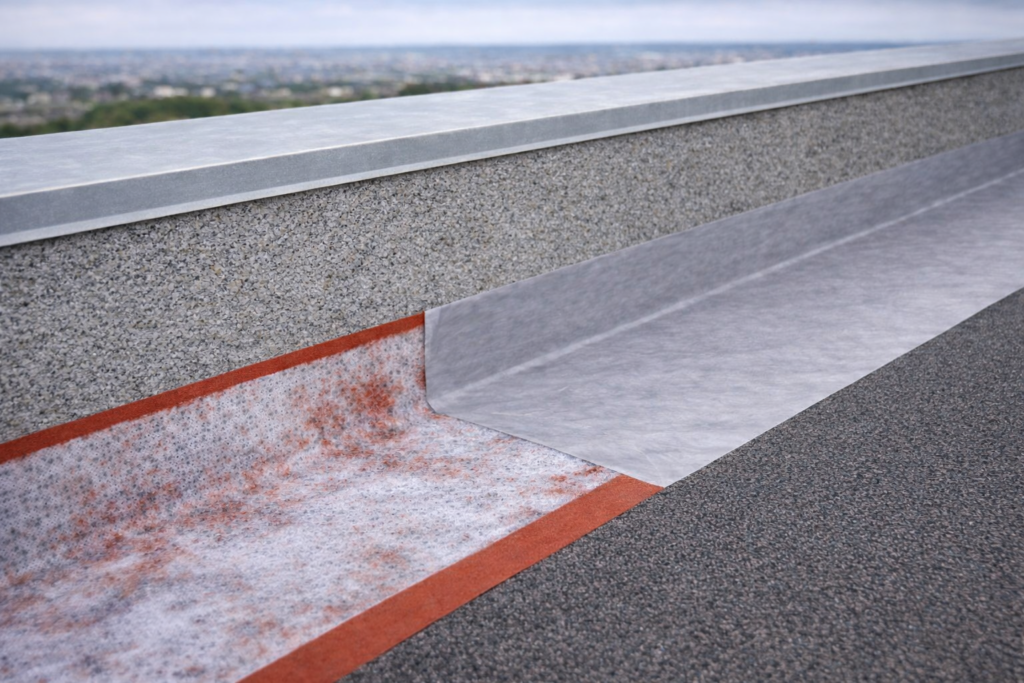
3. Einlage des Polyester-Geotextils
In die frisch aufgetragene Abdichtung wird das Polyester-Geotextil spannungsfrei eingelegt:
faltenfrei,
ohne Einschnitte im Übergangsbereich,
sorgfältig mit Rolle oder Spachtel angedrückt, bis das Geotextil vollständig durchtränkt ist.
An den Übergängen zu bereits ausgeführten Innen- und Außenecken wird das Geotextil 5–10 cm auf die bestehende Abdichtung geführt, um eine durchgehende, sichere Verbindung herzustellen.
4. Zweiter Auftrag der Flüssigabdichtung
Nach vollständiger Trocknung des ersten Auftrags erfolgt der zweite, deckende Auftrag der Flüssigabdichtung über die gesamte Anschlusszone.
Materialempfehlung
Polyester-Geotextil 110 g/m²
für nicht genutzte Flachdächer und geringere mechanische BeanspruchungPolyester-Geotextil 120 g/m²
für stärker beanspruchte Dachflächen oder genutzte Bereiche
Geeignete Rollenbreiten
Je nach Detailgröße empfehlen sich Rollenbreiten von 15 cm, 25 cm, 35 cm oder 50 cm, um materialgerecht, ohne unnötigen Verschnitt zu arbeiten.
Da das Geotextil laufmeterweise geliefert wird, kann die Armierung exakt auf den jeweiligen Detailpunkt abgestimmt werden.
Ergebnis
Dauerhaft verstärkter Parapetanschluss
Reduzierung von Spannungsrissen in kritischen Anschlussbereichen
Zuverlässige Integration in die neue Flüssigabdichtung
Gezielte Instandsetzung ohne vollständigen Rückbau des Dachaufbaus
➡️ Die Abdichtung des Attikaanschlusses erfolgt immer nach der zusätzlichen Verstärkung von Innen– und Außenecken.
Weitere Detailpunkte wie Dachentlüfter oder Wassereinläufe können davor oder danach bearbeitet werden, abhängig von Bauablauf und Objektgegebenheiten.
Die passende Lösung für kritische Detailbereiche
Punktuelle Undichtigkeiten entstehen fast immer an Übergängen, Anschlüssen und Durchdringungen.
Eine dauerhafte Abdichtung erfordert hier gezielte Verstärkung statt flächigem Abriss.
Je nach mechanischer Beanspruchung und Nutzung der Dachfläche kommen unterschiedliche Flächengewichte zum Einsatz:
Polyester-Geotextil 110 g/m² – für nicht genutzte Dachflächen und gering belastete Detailpunkte
Polyester-Geotextil 120 g/m² – für stärker beanspruchte oder genutzte Dachbereiche
Durch die Auswahl geeigneter Rollenbreiten kann das Material präzise und wirtschaftlich an jedem Detailpunkt verarbeitet werden.
Das Ergebnis:
dauerhaft verstärkte Anschlüsse, reduzierte Spannungsrisse und eine sichere Integration in die Flüssigabdichtung –
ohne vollständigen Rückbau des Dachaufbaus.